Ice Drop tutorial

Sunday, August 28, 2011

For Doug

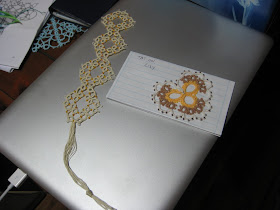
Our friend Doug's father passed away a few weeks ago, and I've been trying to tat a cross bookmark for him. I think I have started and given up on seven crosses in the past three weeks, but I finally finished one! Even this one was started three times. I guess I'm a little distracted with the beginning of school. I was very relaxed as I worked on each cross... so relaxed that I left out important picots, or joined in too many places!


I just kind of finger-pressed it in place. I can see that I'll probably need a little Best Press so that the bottom arm doesn't bulge just below the center motif. I really do like using Best Press!


The picture already says it all, but I think I'll be a bit redundant today. The pattern is from the Motif section of Cathy Bryant's Tatting. I used size 40 Lizbeth, color #117. I used one of my wonderful shuttles from Dave at Grizzly Mountain Arts.

Do you see the corner of a magazine at the top left of the picture? It's the Autumn 2011 issue of Crazy Quilt Gatherings from Pat Winter. I love ordering this magazine! Pat gives a heads up when the new issue is available, and your copy of each issue is printed and mailed after you pay for it. It's also available as a PDF if you're not interested in a hard copy. No subscriptions are necessary. You just order the issues you're interested in. Of course, I've ordered all three so far. : )

This issue was especially interesting to me, because my friend Lelia from Stitches of Life II wrote an article on Kanzashi flowers! Maybe I'll do some retail therapy this afternoon so that I can try making some of these adorable fabric flowers!

Thursday, August 25, 2011

Oh, dear!

I didn't realize that it's been so long since I've posted! I've been busy getting ready for school (we started Monday), and I had a few quilting odds and ends to finish up. My tatting has been sporadic, and not at all productive. I've started several cross bookmarks, and I've abandoned every single one. I guess I have too much school stuff on my mind. I just can't seem to follow a pattern correctly!

I don't see much tatting time in the next couple of weeks, but I will be back!

Tuesday, August 16, 2011

Diamonds

The next design I explored in Tatting Techniques by Elgiva Nicholls is "Diamonds." It's a pretty simple design, but I was surprised by a couple of things. 

First, the author states, "The fourth ring joins to the first picot of the first ring. This join is a difficult one as it is an awkward position. It occurs in many medallions." That's it. Period. She gives no suggestions on how to make that last join! I can see where that would stop many beginning tatters from going any further.


The next thing that surprised me was the join between motifs. See how there are 5 picots on the outer edge of the ring? The directions call for joining the 2nd and 4th picots in that cluster. It made no sense to me. The center picot was just left dangling, and if anything, it looked like I had forgotten to join it. So I backed up and joined all three of those picots. It makes a nice firm join, which I imagine would be helpful if it's being used as an insertion.


Still not satisfied with the join, I decided to leave out the center picot, as you can see on the right hand ring.


I thought it might look a little different, and it might have if my picots were longer. I don't think there's a significant difference in the look. However, there is a difference in the feel. If I decide to make more of the insertion, I think I'll stick with joining the 3 picots because of the nice solid feel.


On another note, the cream color is size 20 Lizbeth. The blue is size 50 Oren Bayen. I think there's a significant size difference, so I'll make sure I don't combine these two threads in a single piece.

Hmmm... seeing these together makes me wonder how this motif would look as a coaster or table mat. That's an idea for another day!

Monday, August 15, 2011

Sue Anna the Enabler

When Sue Anna and I drove to Cincinnati to visit Jane, we had a lot of time to talk, and we did! We talked tatting, school, blogging, family, religion, politics, and bobbin lace. You would think we had known each other all our lives! 

Sue Anna and I met in person for the first time at the Downers Grove Lace Day in June, and the focus was bobbin lace. Sue Anna had wanted to take the bobbin lace class, but it was filled. Lucky Sue Anna owns the video Successful Bobbin Lacemaking for All Occasions with Christine Springett, which is the accompanying video for the book Lace for Children of All Ages. Sue Anna told me how good the video was, and she offered to lend it to me.

Anyway, the video arrived last week, and I finally had time to watch it on Saturday. Sue Anna was right... it's wonderful! I finally learned the correct way to fill my bobbins... so much easier than what I was doing, and the hitch actually held! I watched it from start to finish. I found Christine Springett's voice very soothing. I love English accents!

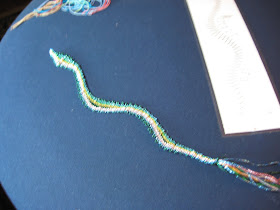
Sue Anna also included samples of Gold Rush embroidery thread... luscious! Blue, two shades of green, pink, white, yellow... all sparkly colors! She also included some silver beads for eyes. Yes, she's an enabler!


I learned a lot from doing this snake. First, it is easier to undo bobbin lace than it is to undo tatting. You see, when I got down past that third bend in the body, I discovered that I had missed a pin further up. Sigh... time to undo more than half of what I had accomplished. When I reached the part where the pin was missing, I discovered that I had missed another pin further up... more to be undone! Okay, I reached that missing pin, only to discover that there was another missing pin above the eyes! So, I learned that I can also undo bobbin lace with beads woven in! In addition, I learned the importance of tensioning at the end of each row. The second time through, my snake had far fewer lumps and bumps!


He doesn't show up very well, but I am very pleased with my snake. I'm sure the kids at school will get a kick out of him. In fact, I think I'll have to make another!

Thanks for enabling me, Sue Anna!

Note to self... learn how to use your camera!

Sunday, August 14, 2011

Daisy Chains


I decided to keep reading and take another lesson from Elgiva Nicholls. This time, the lesson was Daisy Chains. Now Daisy Chains look fairly simple, but this little pattern did present a few challenges for me. First, I decided to eyeball the size of the picots... pretty uneven. I used a picot gauge on the last daisy, and I was much happier with it. So, I think I'll stick to using picot gauges. I knew there was a reason I started using them!

Do you see the mistake between the first and second daisy? Apparently I'm still having trouble following directions. I joined the second daisy to the wrong picot. Oops!


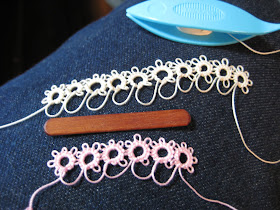
I decided to take my Daisy Chain lesson  a little further. The bottom row is the Daisy Chain from the first picture. The top row shows my continued lesson. I used my picot gauge for all of these daisies, but I also decided to use the width of my shuttle as a measure for the thread length of the "chains" between daisies... much more even. I used a smaller picot gauge for the first four daisies. They seemed too mushed together (notice my used of advanced tatting vocabulary). I then switched to the larger picot gauge pictured. I think the daisies look much better, but I think I could have gone with an even larger picot.

Do you see how the daisies look a bit wonky (another technical term) at the beginning of the row? I started out dropping the shuttle through the ring before closing. I've been told that this makes it easier to open the ring, if necessary, and that the ring lies flatter. I must be doing something wrong, because my rings look terrible! The last three daisies were made without dropping the shuttle through the ring. I guess I'll stick with the method that works for me. Do you have success with dropping the shuttle through the ring?

I also experimented with my joins. On the pink Daisy Chain I used all up joins, the method I originally learned. On the cream colored Daisy Chain I used all down joins. I had read somewhere that a down join gave a smoother look to the ring. After experimenting with the two joins again, I've decided that the down join is for me. Which join do you prefer?

A new challenge

After reading Cindy's posts regarding chains, I decided it was time I learned a little about them myself. I am a voracious reader, but if I want to remember details, I need to go back and read over and over again. Even then, details don't always sink in!


I've read, or maybe I should say I've skimmed, Tatting Techniques by Elgiva Nicholls several times. There are some fascinating pieces in this book, and my favorite is a shuttle shaped design on page 97. I also adore the corner piece on the cover! However, reading/skimming and practicing the techniques presented are two different things, and this morning I decided that maybe I should do a little practicing.

As Glinda the Good Witch states in The Wizard of Oz, "It's always best to start at the beginning." And so I did...


I've never understood why anyone would start their tatting with a chain. However, right there on page 15, I found instructions for starting a chain on a continuous thread. I read; I tried; I conquered! (My apologies to Caesar and Michelle.)


This is very exciting for me! I now understand why there's a need to use a paper clip or striver (so you don't lose your picot at the beginning of the chain, if you want a picot). I also am beginning to see how I can accomplish tatting the beautiful piece on page 97!

I love when I start to understand something!

Friday, August 12, 2011

Just in time!


Yup! This beautiful bookmark arrived just in time for school! I always like to take special bookmarks to school. The kids get a big kick out of seeing what my bookmark of choice is, and thanks to several of my blogging buddies, I have a nice selection for the upcoming school year! This latest one is from Lily, and I know the kids will be fascinated with the beads. Who can resist a little glitter and glitz?

Thank you, Lily!

Thursday, August 11, 2011

Queen size!


I just finished the quilt top for my queen size bed... literally, just finished... about 15 minutes ago! Daughter Joanne came down to visit again this week, and with her encouragement, I've been putting in time on my quilt top. That's Joanne behind the quilt. Isn't she adorable? ; )

I liked the fabric when I bought it, but now that the top is finished, I LOVE it! Since school is starting very soon (the 22nd), I know I won't have time to quilt it before winter. I'd have to give up tatting, and that just isn't going to happen. So, I'm going to take this to my local quilt shop (40 minutes away is about as local as I can get), and I'm going to have it machine quilted.

I wonder what colors I should use in my next quilt?

Monday, August 8, 2011

Shaded Sun by Bri


Isn't it pretty? Bri graciously allowed me to test tat her pattern, and I love it! I chose to follow her suggestions and tat the first one with two colors. It really does help me to see how the design flows. I used size 20 Lizbeth, color #621 and 103. It measures 5 3/4" from picot tip to picot tip. The best thing about this pattern... it's a diagram! I find diagrams so much easier to follow than written instructions. 

Thanks for the opportunity, Bri!

What color should I try it in next? Maybe blue! ; )

Sunday, August 7, 2011

My blue heaven


Some of you may have guessed that blue is my favorite color. I know Bree figured it out! Look at the box of goodies that came my way. Thank you, Bree!

August shuttle winner

Blogger won't let me add the image, so you'll just have to trust me... again!

The August shuttle winner is... drum roll, please...

Carol Lawecki

Congratulations, Carol! Please send me your mailing info, and I'll get your shuttle off to you ASAP.

Thank you to everyone who entered. It's really a boost to my ego to see so many people interested in my little shuttle escapades!

Wednesday, August 3, 2011

August shuttle giveaway!


This little cutie is decorated with fabric left over from my Dorset bag/origami pouch. I don't have any pink shuttles left, so I used green. I think the green, chocolate brown, and cream look really spiffy together!

Leave a comment on this post for your chance to win. I'll be drawing the winner's name this weekend. Good luck!


I love CraftGossip.com