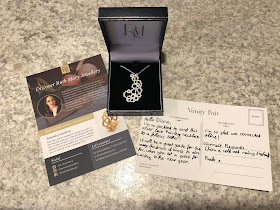
My beautiful new paisley pendant from ruthmary.com arrived today! I am thrilled with it! Guess what I'm wearing to school tomorrow? I am so please with the quality of this pendant, that I plan on sending a piece of my own tatting to be made into a pendant after the holidays. Ruth Mary also has a gorgeous Cascade Necklace. Do I dare have three?
Daughter Joanne has been doing some Christmas prep and shared this picture of her Ice Drop display. They don't all fit on the trees, so Joanne is going to make some wall displays. I'll share pictures once she gets them done. In the meantime, I think this display looks very festive!
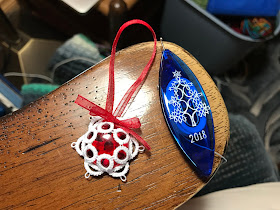
One of the new Ice Drop Addicts members asked what would be a good next step pattern for Ice Drops. I decided to follow my friend Cindy's lead and work with red and white. This is the basic pattern with a slight change in the stitch count to accommodate a slightly larger glass gem.
Next, I added extra picots.
After that, I used the one pass method. I think the basic pattern is great for quick gifts. I can finish one in about an hour, and I usually have an hour to spare each day... unless I get distracted!


Beautiful pendant and ice drop display!!! I like them strewn around like fallen leaves & cones.
ReplyDeleteBut I don't understand the question asked about the next step ?! May be my morning tea hasn't kicked in yet
I think she wanted to know which pattern to use to move beyond the basic pattern. My reply was to change the length and/or size of the picots and/or add beads.
DeleteWonderful necklace!! :)
ReplyDeleteTalk about treasures of Ice Drops, what a fabulous display!!! :)
Great Ice Drops!! :)
I do like the necklace! Joanne has a knack for displaying Ice Drops!
DeleteOh yes, the perfect pendant for a tatter to wear! Joanne’s display is very festive, good to see so many ice drops shown off at once.
ReplyDeleteI'm wearing it now! I do wear some of my tatted pieces, but they're so light weight, they don't always sit nicely. This seems perfect!
DeleteThank you Jane! I love creating the silver pendant and I’m so happy that Diane is loving wearing it.
DeleteAgain, it's difficult keeping up with you! You continue to make progress on all your projects. Amazing that you're low on inventory of ice drops! Really like that peacock one.
ReplyDeleteI'm curious about the metal pendant, which is beautiful. I have been to Ruth's website, but it's not clear to me what happens to the original lace. I understand a 'cast' is made, but can the cast can be used again to make duplicate items?
This would all seem so labor intensive - making the lace and then making the cast, then doing the finishing work on the metal!
I also love the tatted tree shuttle!
I really don't know about the process. All I know is that the necklace is beautiful!
DeleteThanks for your lovely comment Kathy! The casting is a tricky one to explain, but essentially it involves making a mould, taking the lace out, pouring in wax, making another mould, burning the wax away and then pouring in molten silver. I’ve got a little video on my Facebook page here, which I will also upload to my website soon.
DeleteRuth
https://www.facebook.com/164182800287810/posts/1956841291021943/
Beautiful pendant,
ReplyDeleteLovely trees of ice drops, your red and white are gorgeous.