Thursday, December 17, 2020

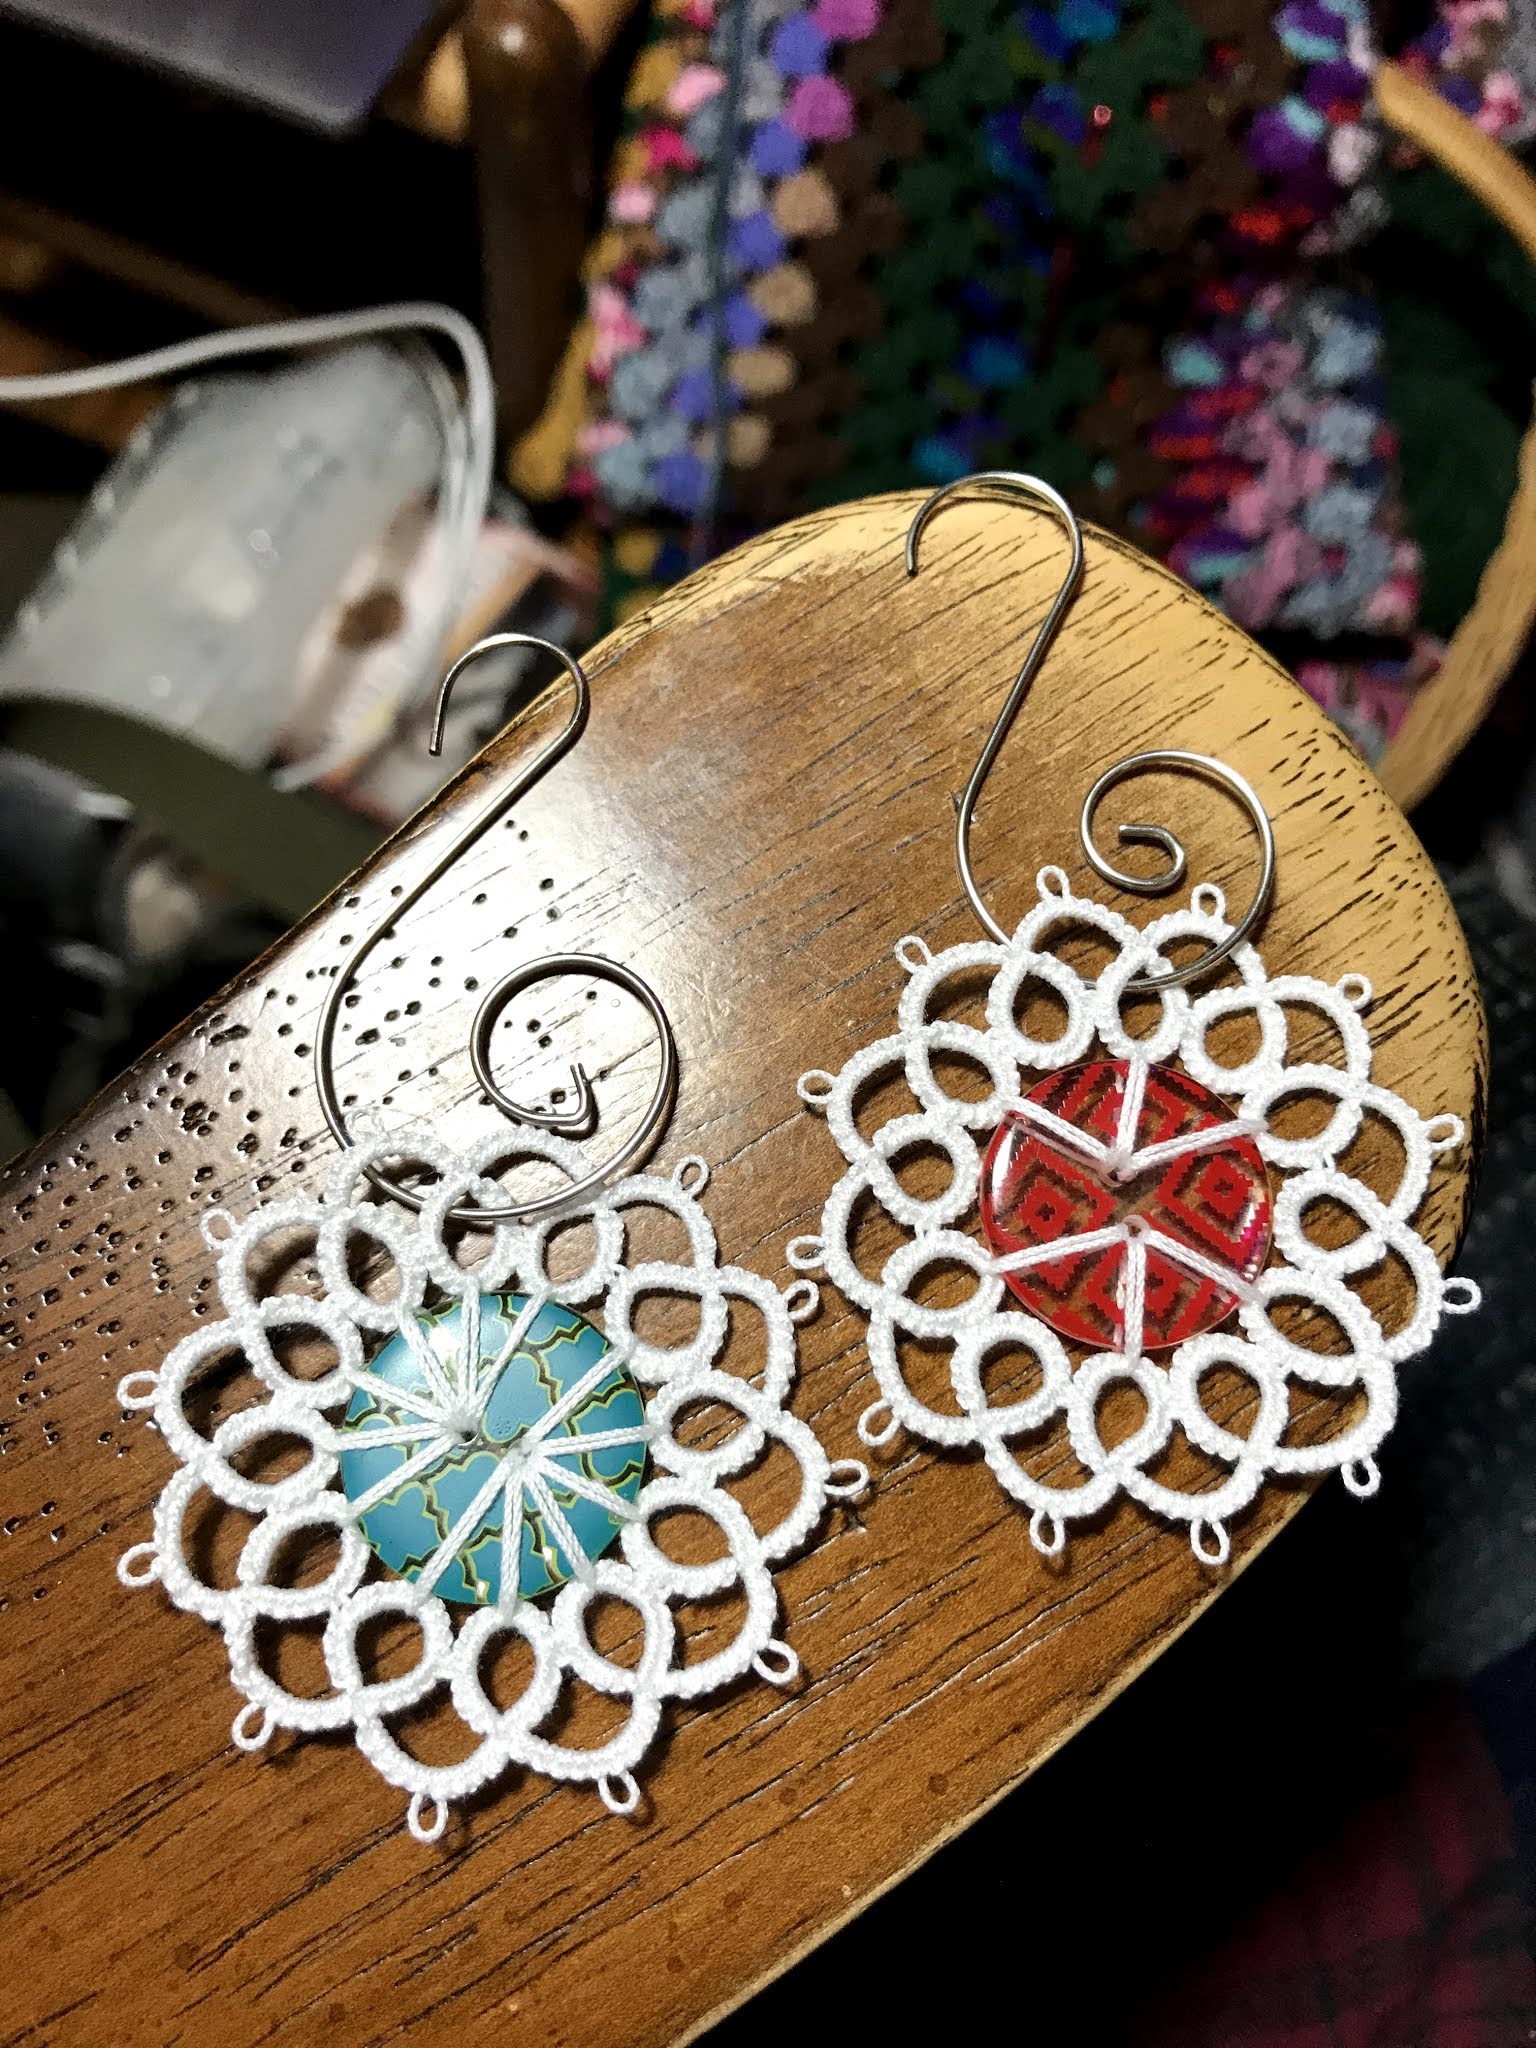
December 17 button ornament


December 17 Button Ornament


Materials:

7/8" two hole button

size 20 thread

2 shuttles wound continuous thread method


Symbols:

+ join

- joining picot

-- decorative picot


Round 1:

Ring: 5 - 5 + 5 - 5, join to hole in button, reverse work

Chain: 5 - 5, reverse work


*Ring: 5 + 5 + 5 - 5, joining to previous ring and hole in button, reverse work

Chain: 5 - 5**


Continue around from * to ** with six joins in each button hole. This will give you a total

of 12 rings and 12 chains. Lock join final chain to base of first ring.


Round 2:

Chain 6, lock join to picot on chain from previous round, do not reverse work, switch

shuttles

Ring 2 -- 2 -- 2 -- 2 -- 2 -- 2 -- 2 -- 2 (7 decorative picots), do not reverse work, switch

shuttles

Chain 5, lock join to picot on chain from previous round, do not reverse work, switch

shuttles

Ring 6, do not reverse work, switch shuttles


Repeat pattern around, lock join to base of first ring. Cut, tie, and hide ends.


Wednesday, December 16, 2020

December 16 button ornament


Today's button ornament is the first one that I feel can be called a snowflake! This is an adaptation of my Bloomin' Ice Drop pattern from June 2017. Have I really been tatting Ice Drops that long?

December 16 Button Ornament


Materials:

7/8" two hole button

size 20 thread

2 shuttles wound continuous thread method


Symbols:

+ join

- joining picot

-- decorative picot


Round 1:

Ring: 5 - 5 + 5 - 5, join to hole in button, reverse work

Chain: 5 - 5, reverse work


*Ring: 5 + 5 + 5 - 5, joining to previous ring and hole in button, reverse work

Chain: 5 - 5**


Continue around from * to ** with six joins in each button hole. This will give you a total

of 12 rings and 12 chains. Lock join final chain to base of first ring.


Round 2:

Chain 9, reverse work.

Ring: 6+6, joining to picot in chain on round 1, reverse work. Switch shuttles.

Ring: 4-4. Switch shuttles. Do not reverse work.

Chain 6 - 1, switch shuttles. Do not reverse work.

Ring: 1+5-1--1-5-1, switch shuttles. Do not reverse work.

Chain 1+6, reverse work.

Ring: 6+6, joining to same picot in chain on round 1 as first ring, reverse work, switch shuttles

Ring: 4-4. Switch shuttles. Do not reverse work.

Chain 9, lock join to base of ring in previous round.

Do NOT reverse work.

Chain 5, lock join to picot on next chain of previous round, do not reverse work,

switch shuttles

Ring 10, close ring, do not reverse work, switch shuttles

Chain 5, lock join to base of next ring of previous round


Continue in pattern to complete 6 pattern repeats. Cut, tie, and hide ends.


Tuesday, December 15, 2020

Button Ornament Base #3


I've switched to a 7/8" two hole button, so I had to figure out a different base pattern. These are scrapbooking buttons that I purchased quite a while back. I wish I could remember where I found them! 

Have you noticed that some button holes are generous while others are very skimpy? Because of that, I've written the pattern for six joins in each hole or for three joins in each hole. Either way, the result has twelve rings going around the button, making it a nice base for snowflake patterns. 

Spending years teaching students about Snowflake Bentley has made me a bit of a snowflake snob. The designs I've done so far are ornaments, because the pattern repeats are not multiples of six. Studying snowflakes drives home the fact that snowflakes have six points or multiples of six. It can't be a snowflake if it has ten points. There... I've said it! 😉

December 15 Button Ornament Base #3


Materials:

7/8" two hole button

size 20 thread

Shuttle and ball


Symbols:

+ join

- joining picot

-- decorative picot


Round 1:

Ring: 5 - 5 + 5 - 5, join to hole in button, reverse work

Chain: 5 -- 5, reverse work


*Ring: 5 + 5 + 5 - 5, joining to previous ring and hole in button, reverse work

Chain: 5 -- 5**


Continue around from * to ** with six joins in each button hole. This will give you a total

of 12 rings and 12 chains. Lock join final chain to base of first ring. Cut, tie, and hide

ends.


If the holes in your button are too small for six joins, this pattern is easy to adapt.


Round 1:

Ring: 5 - 5 + 5 - 5, join to hole in button, reverse work

Chain: 5 -- 5, reverse work

Ring: 5 + 10 - 5, joining to previous ring, reverse work

Chain: 5 -- 5, reverse work


*Ring: 5 + 5 + 5 - 5, joining to previous ring and hole in button, reverse work

Chain: 5 -- 5, reverse work

Ring: 5 + 10 - 5, joining to previous ring, reverse work

Chain: 5 -- 5, reverse work


Note: when using this pattern as a base for other designs, change the decorative picot on the chain to a joining picot.


Monday, December 14, 2020

December 14 button ornament


There's a story behind this one! Laura Blanton and I met through blogging about 13 years ago. We developed a wonderful friendship that included the occasional phone call, and we were even able to get together when I visited my mom the summer after Dad passed away. Laura sat and patiently taught me how to make a split ring, which is still a challenging task for me!

I've been trying to work ahead with these button ornaments, just in case something comes up with holiday preparations that keeps me from tatting... cookie baking, relatives visiting, etc. Well, the evening that I finished writing up the pattern for this one, I decided to check out the Tatted Button Ornaments group on Facebook. My dear friend Laura had just posted her newest button ornament, and it looked very similar to mine! We messaged back and forth about it, and we decided that we had both channeled the same tatting muse!

If you're on Facebook, please check out Laura's version. I think you'll be amazed at the similarity of the two ornaments!

December 14 Button Ornament


Materials:

5/8" four hole button

size 20 thread

2 shuttles wound continuous thread method


Symbols:

+  join

-  joining picot


Round 1:

Ring 4 - 4 + 4 - 4, reverse work (join to button)

Chain 4 - 4, reverse work


*Ring 4 + 4 + - 4, reverse work (join to previous ring and button)

Chain 4 - 4, reverse work**


Repeat from * to ** around button with three joins in first and third holes and two joins in

the second and fourth holes.


Join final chain to base of first ring.


Round 2:

Split ring 8/8

Chain 6, reverse work

Ring 4 + 4, joining to picot on chain of previous round, reverse work

Chain 6, reverse work


*Ring 8 + 8, joining to base of ring of previous round, reverse work

Chain 6, reverse work

Ring 4 + 4, joining to picot on chain of previous round, reverse work

Chain 6, reverse work **


Repeat for * to ** around, joining last chain to top of split ring, 


Round 3:

With right side of button facing you...

Chain 1 - 6, lock join to base of small ring from previous round, do not reverse work,

switch shuttles


*Ring 10, do not reverse work, switch shuttles

Chain 6 - 1, lock join to base of large ring from previous round, do not reverse work,

switch shuttles

Ring 1 + 5 - 2 -- 2 - 5 - 1, close ring, do not reverse work, switch shuttles

Chain 1 + 6, lock join to base of small ring on previous round, don not reverse work,

switch shuttles**

Repeat from * to ** around

Sunday, December 13, 2020

December 13 button ornament


I LOVE the simplicity of this one! When I finish this challenge of mine, I think I might tat up a bunch of these for next year!

December 13 Button Ornament


Materials:

5/8" four hole button

size 20 thread

2 shuttles wound continuous thread method


Symbols:

+  join

-  joining picot


Round 1:

Ring 4 - 4 + 4 - 4, reverse work (join to button)

Chain 4 - 4, reverse work


*Ring 4 + 4 + 4 - 4, reverse work (join to previous ring and button)

Chain 4 - 4, reverse work**


Repeat from * to ** around button with three joins in first and third holes and two joins in

the second and fourth holes.


Join final chain to base of first ring.


Round 2:

Split ring 8/8

Chain 6, reverse work

Ring 4 + 4, joining to picot on chain of previous round, reverse work

Chain 6, reverse work


*Ring 8 + 8, joining to base of ring of previous round, reverse work

Chain 6, reverse work

Ring 4 + 4, joining to picot on chain of previous round, reverse work

Chain 6, reverse work **


Repeat for * to ** around, joining last chain to top of split ring, Cut, tie, and hide ends.


Saturday, December 12, 2020

December 12 button ornament

I had to double check my ornaments when I saw this picture. It's so similar to the one I posted yesterday!

December 12 Button Ornament


Materials:

5/8" four hole button

size 20 thread

2 shuttles wound continuous thread method


Symbols:

+  join

-  joining picot


Round 1:

Ring 4 - 4 + 4 - 4, reverse work (join to button)

Chain 4 - 4, reverse work


*Ring 4 + 4 + 4 - 4, reverse work (join to previous ring and button)

Chain 4 - 4, reverse work**


Repeat from * to ** around button with three joins in first and third holes and two joins in

the second and fourth holes.


Join final chain to base of first ring.


Round 2:

Chain 4, reverse work

Ring 4 + 4, joining to picot on chain of previous round, reverse work

Chain 7 - 1, reverse work

Ring 8 + 8, joining to same picot on chain of previous round, reverse work, switch

shuttles

Ring 1 + 6 - 1, do not reverse work, switch shuttles

Chain 1 + 7, reverse work

Ring 4 + 4, joining to same picot on chain of previous round, reverse work

Chain 4, lock join to base of ring on previous round.


Repeat around. Cut, tie, and hide ends.


Friday, December 11, 2020

December 11 button ornament


It's a good thing I'm just listing my button ornaments by date. I'd never be able to come up with enough names for them all!


December 11 Button Ornament


Materials:

5/8" four hole button

size 20 thread

2 shuttles wound continuous thread method


Symbols:

+  join

-  joining picot

-- decorative picot


Round 1:

Ring 4 - 4 + 4 - 4, reverse work (join to button)

Chain 4 - 4, reverse work


*Ring 4 + 4 + 4 - 4, reverse work (join to previous ring and button)

Chain 4 - 4, reverse work**


Repeat from * to ** around button with three joins in first and third holes and two joins in

the second and fourth holes.


Join final chain to base of first ring.


Round 2:

With right side of button facing you...


Split ring 6/6, do not reverse work,

Chain 10 - 2, reverse work

Ring 10 + 10, joining to picot on chain of previous round, reverse work, switch shuttles

Ring 2 + 6 - 1 - 1 - 6 - 2, close ring, switch shuttles

Chain 2  + 10, reverse work


*Ring 6 + 6, joining to base of ring in previous round

Chain 10 - 2, reverse work

Ring 10 + 10, joining to picot on chain of previous round, reverse work, switch shuttles

Ring 2 + 6 - 1 - 1 - 6 - 2, close ring, switch shuttles

Chain 2  + 10, reverse work**


Repeat from * to ** around, joining last chain to top of split ring. Cut, tie, and hide ends.