Sunday, March 27, 2011
What a weekend!
First, I received Fox's traveling copy of Let's Tat by Angeline H. Crichelow. Marie sent it to me from Florida, along with a nice little note and a beautiful tatted piece. I've read about a third of the book, and I find it very interesting! Yes, I'm reading the patterns. I'm finding that the more I read the patterns, the easier it is to understand Angeline's directions. Of course, I find that true of any tatting book!
I don't know why, but every time I start a new book, I have the desire to go back and look at my Mary Konior books. That happened this weekend! I looked through A Pattern Book of Tatting and decided to edge a hanky in Forget-me-not. The hanky is one I found in a dollar store in Alabama when I was visiting my mom. I'm using size 20 Lizbeth, Juicy Watermelon. I think the colors match perfectly!
Tattin' Kat sent me some blinging paper. She didn't want me to run out of things to do over my spring break! So, I obliged and blinged up the last of my shuttles. Thanks Tattin' Kat!
Two of the black and white ones were made previously, but I added bling to the back, so I included them in the picture. I guess I'll take a break from blinging now. I'm out of shuttles, at least until I finish cleaning my sewing room!
Today I felt the urge to tat a motif, and Nancy Tracy's Tatted Medallion called to me! If you haven't signed up for Nancy's free newsletter, now's the time. She sends out recipes and free tatting patterns every month. You can find her store and information about the free newsletter at http://be-stitched.com.
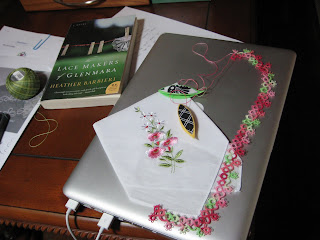
This morning I spent time reading The Lace Makers of Glenmara by Heather Barbieri. This was a gift from Lelia in the One World One Heart event. It's light reading, and I'm already half way through the story! This afternoon Dave and I caught up on some t.v. shows we had recorded. I'm amazed at how much of my hanky edging I completed. Now, if I'd only get off the computer, I might get some more done! ; )
Friday, March 25, 2011
Janet's edging finished!
With the flash...
and without the flash.
I had to follow the pattern very carefully, and now that I've finished, I see that I missed a join. Oh, well! I'm going to take a break from this pattern, and then I'm going to try it without the shoelace trick between motifs.
I hope Janet likes it! Then again, what's not to like? : )
Thursday, March 24, 2011
Too much fun!
My friend Denise, Lace Rn, and I don't get to actually get together very often, even though we only live about 5 minutes away from each other. I'm a teacher, and she's an emergency room nurse. I work 8-3:30, Monday through Friday. She works 7 p.m. to 7 a.m. whenever she is scheduled. We talk on the phone almost every day, but we're lucky to actually see each other a few times a year! Tuesday was one of those lucky days!
Back when I first started blinging shuttles, Denise was able to come over one day, and we played around. I think we blinged half a dozen shuttles, and we were thrilled! This time, we got carried away, and between the two of us, we must have decorated two dozen shuttles!
I had so much fun arranging the shuttles into flowers. Spring must be in the air! I just can't part with this group. I think I'll be selfish and keep all of them for myself!
These three shuttles were decorated with fabric from Bree,
and these three shuttles were decorated with paper from Marty. I'm saving them for future giveaways on my blog. The pictures are terrible, but the shuttles are beautiful!
I really love the way the black and white paper shows up on these Clovers! Sorry, everyone... these are all mine! However, if you'd like some black and white paper, I still have a ton of it left! Just send me your mailing info.
This batch is going with me to the lace event in Lafayette, Indiana, in April. Denise and I are so excited about going! Who knows, if you come up to me and tell me you read my blog, you just might walk away with your favorite!
Denise found these adorable little frog containers at the dollar store. They're filled with a skein of HDT and a blinged shuttle. Tatters will be able to find them on the raffle table in Lafayette.
Yes, we prepared more raffle items! Denise filled these adorable little chests with Lizbeth thread and Sew Mate shuttles. The colors of all the items coordinate!
I found these little chests at Hobby Lobby. They have thread, EZ bobs, and blinged shuttles inside.
Last, but not least, Denise and I put together shuttle blinging kits! Each kit has a shuttle, an assortment of paper, and gems.
I suppose we went a little crazy, but we had so much fun! Hope to see you in Lafayette!
Oh, and Geraldine... we ate most of the chocolate you sent... it was scrumptious!
Sunday, March 20, 2011
In between tatting...
Leafy Greens for Janet
Leafy Greens arrived in the mail this week, so Friday night I wound my shuttles and started my fourth test tat for my sister Janet. I think the color Janet chose is perfect!
You're looking at two pattern repeats plus one ring, and it's 6 1/2" long. That means I'll need six pattern repeats to reach 18". I'm going to finish this piece following the directions, and then I'm going to make another without the shoelace trick between pattern repeats. I think that will give a more meandering look to the pattern. Janet can then choose which one she likes, or she can take them both!
Saturday, March 19, 2011
Dear, sweet Noreen...
sent me the loveliest surprise package! Noreen claims I started it all, but I think she did... every once in a while, we send each other a little present. This time I received an adorable little organizer bag, a beautiful blue scarf, some luscious thread, and two gorgeous doilies crocheted by Reen!
I didn't start blogging so that I could send or receive gifts, but it seems that blogging brings out a desire to share with others. The gifts we exchange are wonderful, but far more important to me are the friendships I have developed. I love the warm words of encouragement when I try something new, and I get excited about tatting, blinging, crocheting, knitting, sewing, quilting, etc. by reading about what all of my new friends are doing.
Isn't blogging grand?
Friday, March 18, 2011
More gifts in the mail!
Look at all the lovely blinging goodies from Bree! I've already called Denise to see if there's a day we can get together next week. After looking through my new stash, my mind is reeling with possibilities. I really need Denise to reign me in! Did you see the beautiful amulet bag? Bree made it! It is so beautiful. Oh, and there's also a thread sample. Thank you for your generosity, Bree! I think I'm going to be doing a lot of show and tell in the near future!
Of course with all the goodies from Marty and Bree, I've been inspired to decorate more shuttles. Here's the latest batch. These are made with the adhesive paper I found at Hobby Lobby. I still have quite a bit of adhesive paper left, so if you're interested in trying some, let me know!
Believe it or not, I finally have a tatted piece I can show you! This is "Alexandra" from Tatting Patterns by Lyn Morton. I love Lyn's patterns, and I was inspired to pull her book off the shelf again when Geraldine told me that Lyn is part of her tatting group. Isn't that cool? I feel like I know someone famous!
Thursday, March 17, 2011
Holy cow!
Look at what came in the mail! Marty and I agreed to a "shuttle exchange." I think Marty got a little carried away! I'm not complaining, mind you. I'm just overwhelmed by her generosity!
I was expecting one paisley shuttle, and look... there are two! They even came in a matching paisley box. There are two more shuttles for me to bling, as well as the materials for blinging! There's even chocolate! Can you tell that I'm excited?
I sure never expected to receive so much. Thank you, Marty! I think I know what I'll be doing on spring break next week!
Tuesday, March 15, 2011
When is a snowflake not a snowflake?
Better late than never!
... and I am very late in thanking Lelia from Stitches of Life II for my wonderful prizes from the One World One Heart event. I'm looking forward to reading The Lace Makers of Glenmara when we are on spring break next week. Somehow, I don't seem to get much reading done in the evening. It's read or tat, and right now tatting wins! Lelia was kind enough to include a bookplate... librarians love bookplates... a butterfly of her own design, one of Patti Duff's minitats, and three samples of Lizbeth thread.
I am one lucky winner! Thank you, Lelia!
Monday, March 14, 2011
Yes, I've been tatting...
but I can't really show it to you yet. I'll just say that you're looking at nearly three weeks worth of tatting, and I promise to show it to you when I can.
What I can show you is my newest crop of shuttles! I went shopping with my daughter Andrea on Friday, and I found more border strip paper. Unfortunately, this is not the adhesive-backed paper. Still, I managed to make a shuttle-shaped template and get it all put together. I really like the black and white paper. The nice thing is that black and white goes with any color shuttle! Yes, I added glitter nail polish, and I'm very pleased with the results!
Let me know if you're interested in some of this pretty paper. I'll be happy to share!
Wednesday, March 9, 2011
Dear Geraldine,
Thank you very much for the lovely package of blinging goodies that you sent my way. I've been having so much fun!
Look at this, not one, but three lily shuttles! The one in the middle is my favorite, and it looks that way accidentally. See how white the lilies look? That's because I did not separate all the layers of the napkin. I thought I had, but after applying the Mod Podge, I realized I hadn't. The lilies that look green and yellow look that way because I did remove all the extra layers of napkin, and the shuttle color shows through. Now I understand why Decoromana paints her shuttles with white acrylic paint before applying the napkin!
What do you think of the leopard shuttles? I added glitter nail polish to the one. I think I should have left it alone. Maybe a female leopard would like it, though. I think the flower shuttles turned out great! I like that the pink and blue of the shuttles shows through. In this case, I think the glitter was the perfect touch. It kind of reminds me of flowers in the garden after a rain shower!
Here you see a picture of my first two shuttles with the adhesive paper that I blogged about. I'm very pleased with the results! I'll be sending you samples of the paper with your shuttles.
Thanks again for all the goodies! I haven't touched the chocolate yet. On Tuesday, I forgot it was Tuesday. I'm not quite sure how that happened. Luckily, there's another Tuesday coming up soon!
Time to get some tatting done...
Diane
Bling buddy update...
Adhesive paper samples went out yesterday for the responses I received before I left for school. The rest will go out today. I hope you enjoy them!
I still have some left, if there's anyone else who would like to try blinging with adhesive paper. Just send me your mailing info. My email is DianeCademartori at gmail dot com.
Monday, March 7, 2011
Calling all bling buddies!
I went craft shopping today, something I haven't done in a long time... well, at least not on the level of today's excursion! I printed out and clipped coupons, hit JoAnn Fabrics, Hobby Lobby, and Michaels... whew!
I bought half price shuttles at JoAnn's, discounted thread at Hobby Lobby, and "jewels" at Michaels. I also found this amazing stuff... adhesive paper! It was $6 for 60 sheets, a little pricey, but it's adhesive! I decided to try it for blinging shuttles. Let me tell you, ladies and gents, I'm in love with this amazing paper! It sticks beautifully! I tried Marty's suggestion and used curved-tip scissors to trim the paper... great idea, Marty! I'm still using the Mod Podge and glitter nail polish, so the shuttles aren't ready for their debut just yet, but I promise to post pictures soon!
Now, the reason for this all-call... there's no way I'll ever use all of this paper. Each strip is enough to cover the front and back of two shuttles. That's 120 shuttles! I'm afraid I can't afford to buy that many shuttles just to bling them. So, if you have any interest in blinging shuttles, send me your mailing info, and I'll send you enough paper for two shuttles. You've got to try this stuff!
Oops! I guess I'd better give my email address... DianeCademartori at gmail dot com
Sunday, March 6, 2011
I've been keeping a secret!
I've found another shuttle decorator, Emma! She has an Etsy shop, and I love her shuttles! My first ones arrived yesterday. I promise not to order any more for a while so that each of you has a chance to get one! ; )
P.S. - You'll have to wait for her to list some more... they're all gone!
Saturday, March 5, 2011
New shuttles!
Look what came in the mail yesterday... all the way from Denmark! I just couldn't help myself. After following a thread regarding miniature shuttles at InTatters, I visited Keld Olesen's website. I fell in love with all the beautiful woods, and it was very hard to restrain myself and only order two shuttles!
When you visit the web site, be prepared to choose your shuttle(s) and send an email to Mr. Olesen regarding availability. He does accept PayPal. My shuttles arrived in 9 days, which I think is pretty good.
I had never heard of Thuja or Kingwood before. I am so happy with these two little beauties. I've already put the Thuja shuttle to work on a bookmark... pics tomorrow!
P.S. - Google translate works great! ; )
And the spring bling winner is...
Wednesday, March 2, 2011
Blinging my way
I've had several people ask, so I thought I'd share the way I bling.
First, gather the necessary supplies: shuttles, Mod Podge, paint brush (I use the sponge style), fabric or decorative paper, spray on acrylic sealer, glitter top coat nail polish, "gemstones".
1. Paint a layer of Mod Podge on to the shuttle, not too thin, not too thick.
2. Press a piece of fabric or decorative paper on to the shuttle. Let dry for at least one hour.
3. Trim excess fabric/paper with scissors or craft knife.
4. Add your "gemstones".
5. If you want glitter, paint on a layer of glitter nail polish.
6. Apply five layers of Mod Podge, allowing an hour drying time between each layer.
7. Spray on two coats of acrylic sealer, allowing 15-30 minutes between coats.
8. Let dry 24 hours before use, otherwise the shuttle will feel sticky or tacky.
A few hints:
1. I wipe off the excess Mod Podge on the sides of the shuttle with the side of the sponge brush after applying each coat. I think it's necessary for a little Mod Podge to be on the sides, but it's not necessary to have a build-up.
2. I use a craft knife to trim as needed after each layer except the final one. If there are any rough edges when the shuttle is finished, I smooth them with an emery board.
3. When decoupaging Clover shuttles or Sew Mate shuttles with points, I only decoupage the top of the shuttle. I do not have the dexterity to make the bottom look as nice as the top, and I would rather leave it undecorated than have it look messy. I have decorated the top and bottom successfully, but I've been very unhappy with most of my results. However, I find it very easy to do both sides of the Sew Mates without points.
4. If you don't use Tatsy shuttles because of those raised letters that catch the thread, decoupage could be the answer for you!
Please don't think that my way is the only way! This is what makes me happy.
I own some of LaCossette's decoupaged shuttles, and they are fabulous! The have a totally different look and feel from mine. Hers are much more refined!
I have several shuttles from swaps and that have been sent as gifts. They are all beautiful, and they are all different. If given the opportunity, I would love to sit down with others who bling shuttles and see how everyone else does it.
Please post pictures of your blinged shuttles! I would love to see what you do, and if anyone is interested in a swap, let me know!
Tuesday, March 1, 2011
Test Tat #3
Isn't it pretty? This is size 20 "Fern" by Yarnplayer. This one will have to be for me, because I don't have enough thread for 18". Even though I knew there wouldn't be enough for my sister's piece, I felt compelled to try it out, and I'm glad I did!
Here are the three pieces together. None of these is quite right for my sister, but I don't mind. I'm having fun with this project!
Subscribe to:
Posts (Atom)